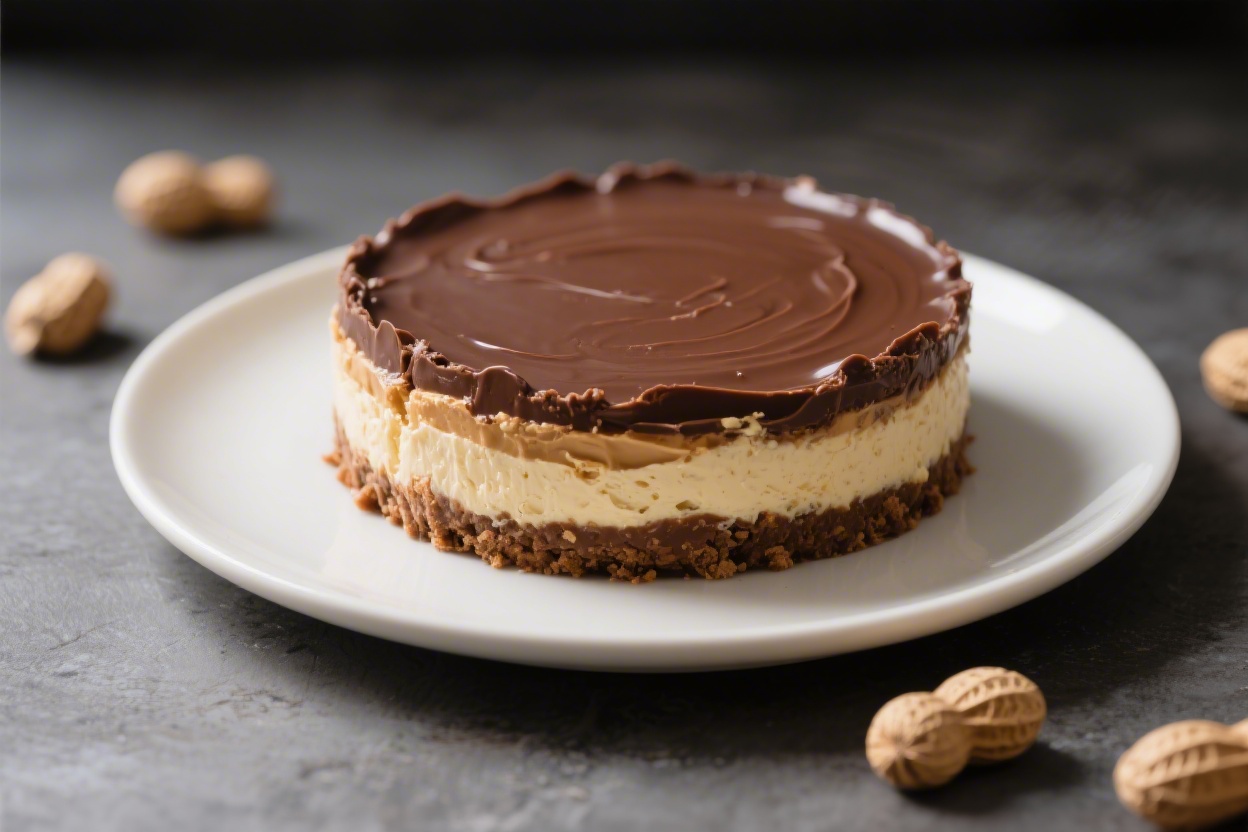
No Bake Chocolate Peanut Butter Cheesecake
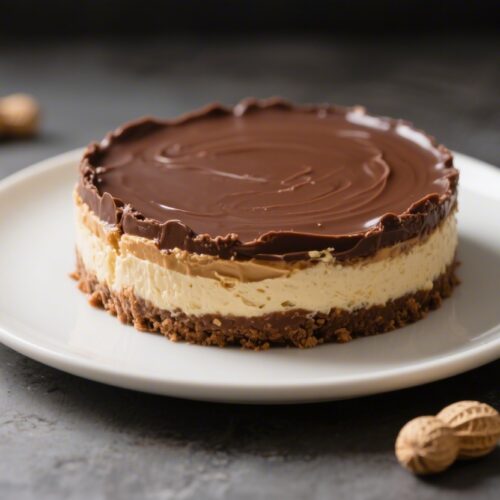
This cheesecake is like a peanut butter cup in silky, sliceable form—no oven, no fuss. It’s smooth, chocolatey, and perfectly balanced with just the right amount of sweetness. The crust comes together in minutes, and the filling is creamy without being heavy.
If you love peanut butter and chocolate, this is the dessert you make when you want big flavor with minimal effort. It’s impressive enough for guests and easy enough for a weeknight treat.
What Makes This Recipe So Good
- No baking required: The crust sets in the fridge, and the filling firms up without heat. It’s perfect for warm days or busy schedules.
- Ultra-creamy texture: Cream cheese, peanut butter, and whipped cream combine for a lush, mousse-like filling.
- Balanced flavor: The chocolate crust supports the peanut butter filling, and a simple ganache on top gives it a polished finish.
- Make-ahead friendly: This cheesecake actually tastes better the next day once it fully chills.
- Customizable: Adjust sweetness, use different cookies for the crust, or top with chopped peanuts, mini cups, or flaky salt.
Ingredients
- For the crust:
- 2 cups chocolate cookie crumbs (like Oreo crumbs; remove filling if using whole cookies)
- 6 tablespoons unsalted butter, melted
- 2 tablespoons granulated sugar (optional, for a slightly sweeter crust)
- Pinch of salt
- For the peanut butter cheesecake filling:
- 16 ounces cream cheese, softened
- 1 cup creamy peanut butter (not natural; use a no-stir variety for best texture)
- 3/4 cup powdered sugar
- 1 teaspoon pure vanilla extract
- 1/8 teaspoon fine salt
- 1 cup cold heavy whipping cream
- For the chocolate ganache topping:
- 1 cup semisweet chocolate chips or chopped chocolate
- 1/2 cup heavy cream
- 1 tablespoon butter (optional, for extra gloss)
- Optional garnishes:
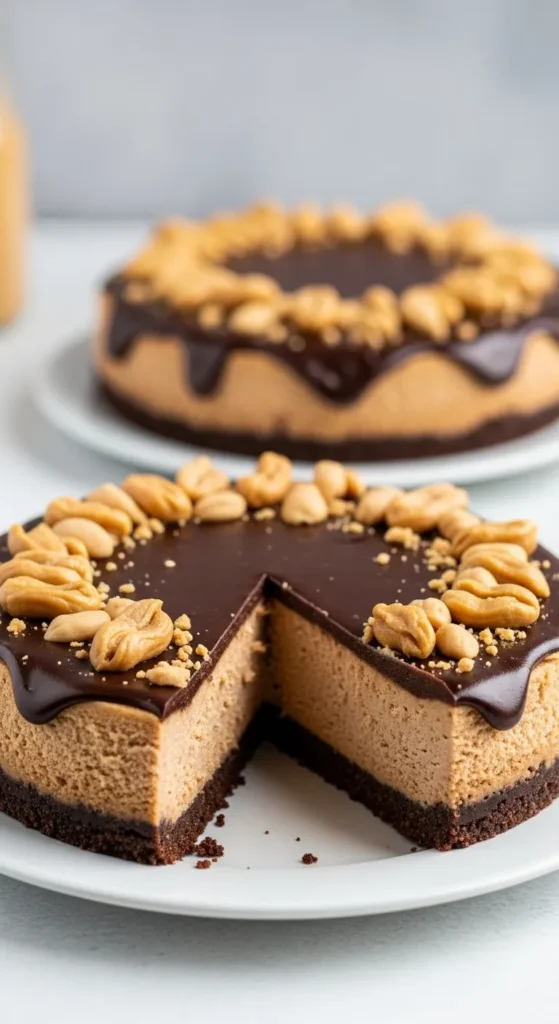
- Chopped roasted peanuts
- Mini peanut butter cups
- Chocolate shavings or curls
- Flaky sea salt
How to Make It
- Prepare the pan: Line the bottom of a 9-inch springform pan with parchment.Lightly grease the sides to help clean release.
- Make the crust: In a bowl, mix cookie crumbs, melted butter, sugar, and a pinch of salt until the texture resembles wet sand. Press firmly into the bottom and 1 inch up the sides of the pan. Use a flat-bottomed glass for an even layer.Chill while you make the filling.
- Whip the cream: In a cold bowl, whip the heavy cream to stiff peaks. Set aside. This will keep the filling light and airy.
- Beat the base: In another bowl, beat softened cream cheese until smooth and lump-free.Add peanut butter, powdered sugar, vanilla, and salt. Beat until creamy and well combined. Scrape down the bowl to avoid streaks.
- Fold it together: Gently fold the whipped cream into the peanut butter mixture in two additions.Keep strokes soft to avoid deflating the cream. The mixture should be thick but spreadable.
- Fill the crust: Spoon the filling into the chilled crust and smooth the top with an offset spatula. Tap the pan lightly on the counter to settle any air pockets.Chill for at least 4 hours, preferably overnight, until set.
- Make the ganache: Heat heavy cream just to a simmer. Pour over chocolate (and butter, if using) in a bowl. Let sit 2 minutes, then stir until silky.Cool 10–15 minutes until slightly thickened but still pourable.
- Top the cheesecake: Pour ganache over the chilled cheesecake, tilting the pan for an even layer. Add garnishes while the ganache is still soft. Chill 30–45 minutes until the top is set.
- Unmold and serve: Run a thin knife around the edge, then release the springform ring.Slice with a warm, clean knife, wiping between cuts for neat pieces.
How to Store
- Refrigerator: Cover loosely with plastic wrap or a cake dome. Store up to 5 days. The texture remains smooth, and flavors deepen by day two.
- Freezer: Freeze slices on a sheet pan until firm, then wrap individually and store up to 2 months.Thaw in the fridge overnight. Add fresh garnish after thawing.
- Serving temp: For the best texture, let the cheesecake sit at room temperature for 10–15 minutes before serving.
Benefits of This Recipe
- Time-saving: No oven time, and the steps are straightforward.
- Beginner-friendly: Minimal equipment and forgiving technique.
- Crowd-pleaser: Familiar flavors that win over both kids and adults.
- Make-ahead dessert: Perfect for holidays and parties when you want one less thing to manage on the day.
- Gluten-free option: Use gluten-free chocolate cookies for the crust without changing the filling.
Pitfalls to Watch Out For
- Using natural peanut butter: The oils can separate and make the filling runny. Stick with a no-stir creamy peanut butter.
- Under-whipping the cream: Soft peaks won’t hold the structure.Aim for firm, glossy peaks without going grainy.
- Not chilling long enough: If you rush the chill, the cheesecake may not slice cleanly. Plan for at least 4 hours, ideally overnight.
- Warm ganache on a soft filling: If the ganache is too hot, it can melt the cheesecake surface. Let it cool slightly before pouring.
- Crust too loose: If the crumb mixture seems dry, add another tablespoon of melted butter so it compacts firmly.
Alternatives
- Crust swaps: Try graham crackers with 2 tablespoons cocoa powder, chocolate wafer cookies, or pretzels for a salty-crunchy twist.
- Different nut butters: Almond or cashew butter works if it’s thick and no-stir.Adjust sweetness to taste.
- Lighter version: Use reduced-fat cream cheese and swap half the whipped cream with Greek yogurt. The texture will be slightly softer.
- No ganache: Skip the topping and drizzle with melted chocolate or warm peanut butter just before serving.
- Mini cheesecakes: Divide between lined muffin tins and chill. Great for portion control and parties.
FAQ’s
Can I use natural peanut butter?
Natural peanut butter tends to separate and can make the filling greasy or too soft.
For best results, use a no-stir creamy peanut butter with a consistent texture.
How long does it need to chill?
Aim for at least 4 hours, but overnight is ideal. The longer chill helps the filling set fully and makes cleaner slices.
What if I don’t have a springform pan?
Use a 9-inch pie dish or an 8×8-inch square pan. Line with parchment for easier removal and cut into bars or slices.
Can I reduce the sugar?
Yes.
You can drop the powdered sugar in the filling to 1/2 cup and skip the crust sugar. Taste as you go and adjust to your preference.
How do I prevent lumps in the filling?
Start with room-temperature cream cheese and beat it until completely smooth before adding other ingredients. Scrape the bowl often and fold in the whipped cream gently.
What chocolate is best for the ganache?
Use semisweet for balance.
If you prefer a deeper chocolate flavor, go with bittersweet. Milk chocolate works too but will be sweeter and slightly softer.
Can I make it dairy-free?
Use dairy-free cream cheese, coconut cream for whipping, and dairy-free chocolate. Check labels on cookies and butter substitutes.
The texture will be a bit different but still delicious.
Related Recipes
- No Bake Eclair Cake – Simple, Creamy, Crowd
- No Bake Mini Cheesecakes – Creamy, Cute, and Effortless
- No Bake Chocolate Desserts – Easy, Creamy, and Crowd-Pleasing
Final Thoughts
This No Bake Chocolate Peanut Butter Cheesecake delivers rich flavor with almost no effort. The layers are simple but satisfying: a crunchy chocolate crust, a smooth peanut butter filling, and a glossy chocolate finish. It’s the kind of dessert that feels special without keeping you in the kitchen.
Keep the ingredients on hand, and you’ll always have a crowd-pleasing treat ready to go. Once you try it, it might just become your go-to no-bake showstopper.
No Bake Chocolate Peanut Butter Cheesecake - Creamy, Rich, and Effortless
Ingredients
- For the crust: 2 cups chocolate cookie crumbs (like Oreo crumbs; remove filling if using whole cookies)
- 6 tablespoons unsalted butter, melted
- 2 tablespoons granulated sugar (optional, for a slightly sweeter crust)
- Pinch of salt
- For the peanut butter cheesecake filling: 16 ounces cream cheese, softened
- 1 cup creamy peanut butter (not natural; use a no-stir variety for best texture)
- 3/4 cup powdered sugar
- 1 teaspoon pure vanilla extract
- 1/8 teaspoon fine salt
- 1 cup cold heavy whipping cream
- For the chocolate ganache topping: 1 cup semisweet chocolate chips or chopped chocolate
- 1/2 cup heavy cream
- 1 tablespoon butter (optional, for extra gloss)
- Optional garnishes: Chopped roasted peanuts
- Mini peanut butter cups
- Chocolate shavings or curls
- Flaky sea salt
Instructions
- Prepare the pan: Line the bottom of a 9-inch springform pan with parchment. Lightly grease the sides to help clean release.
- Make the crust: In a bowl, mix cookie crumbs, melted butter, sugar, and a pinch of salt until the texture resembles wet sand. Press firmly into the bottom and 1 inch up the sides of the pan. Use a flat-bottomed glass for an even layer. Chill while you make the filling.
- Whip the cream: In a cold bowl, whip the heavy cream to stiff peaks. Set aside. This will keep the filling light and airy.
- Beat the base: In another bowl, beat softened cream cheese until smooth and lump-free. Add peanut butter, powdered sugar, vanilla, and salt. Beat until creamy and well combined. Scrape down the bowl to avoid streaks.
- Fold it together: Gently fold the whipped cream into the peanut butter mixture in two additions. Keep strokes soft to avoid deflating the cream. The mixture should be thick but spreadable.
- Fill the crust: Spoon the filling into the chilled crust and smooth the top with an offset spatula. Tap the pan lightly on the counter to settle any air pockets. Chill for at least 4 hours, preferably overnight, until set.
- Make the ganache: Heat heavy cream just to a simmer. Pour over chocolate (and butter, if using) in a bowl. Let sit 2 minutes, then stir until silky. Cool 10–15 minutes until slightly thickened but still pourable.
- Top the cheesecake: Pour ganache over the chilled cheesecake, tilting the pan for an even layer. Add garnishes while the ganache is still soft. Chill 30–45 minutes until the top is set.
- Unmold and serve: Run a thin knife around the edge, then release the springform ring. Slice with a warm, clean knife, wiping between cuts for neat pieces.
Printable Recipe Card
Want just the essential recipe details without scrolling through the article? Get our printable recipe card with just the ingredients and instructions.