No Bake Biscoff Cheesecake – Creamy, Crunchy, and Effortless
If you love Biscoff’s warm caramel spice and creamy desserts that don’t need the oven, this cheesecake is it. The crust is buttery and crunchy, the filling is smooth and tangy, and the Biscoff flavor runs through every bite. It’s easy enough for beginners but impressive enough for guests.
You can make it ahead, forget about it in the fridge, and bring it out when you’re ready to serve. Simple, reliable, and wildly delicious.
Why This Recipe Works
- No bake, no fuss: The filling sets in the fridge, so there’s no baking or water baths to worry about.
- Balanced flavor: Cream cheese and lemon cut through the sweetness of Biscoff for a clean, creamy finish.
- Dependable texture: Whipped cream adds lift, while melted Biscoff and powdered sugar keep things silky and stable.
- Make-ahead friendly: It needs chill time, which makes it ideal for events and stress-free hosting.
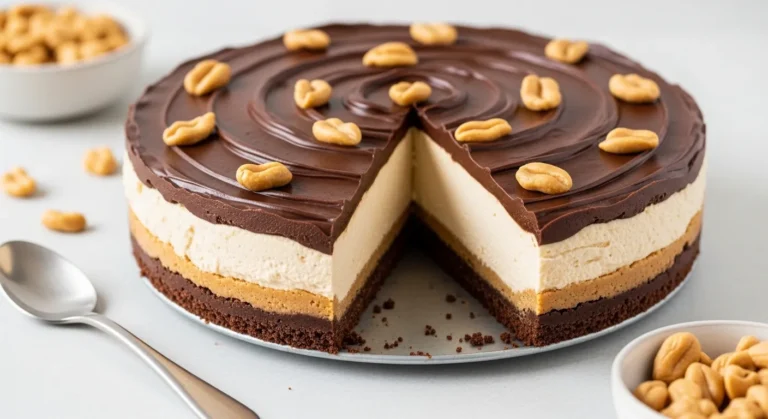
- Layered Biscoff experience: Biscuit crust, Biscoff in the filling, and a glossy Biscoff topping for full-on flavor.
Ingredients
- For the crust:
- 300 g Lotus Biscoff biscuits (about 10.5 oz), crushed into fine crumbs
- 120 g unsalted butter (about 1/2 cup), melted
- 1/4 tsp fine salt (optional, enhances flavor)
- For the filling:
- 600 g full-fat cream cheese, room temperature
- 300 ml heavy cream or double cream, cold
- 200 g smooth Biscoff spread (about 3/4 cup), room temperature
- 120 g powdered sugar (1 cup), sifted
- 1 tsp pure vanilla extract
- 1–2 tsp fresh lemon juice
- 1/8 tsp fine salt
- For the topping:
- 150 g smooth Biscoff spread (about 1/2 cup), gently warmed
- 4–6 Biscoff biscuits, crushed or left whole for garnish
- Optional: a drizzle of melted dark chocolate or whipped cream swirls
- Equipment:
- 8- or 9-inch (20–23 cm) springform pan
- Electric mixer (hand or stand)
- Mixing bowls, spatula, and offset spatula
- Food processor or rolling pin for crumbs
Step-by-Step Instructions
- Prepare the pan: Line the base of your springform pan with parchment. Lightly grease the sides to help with clean release.
- Make the crust: Crush the Biscoff biscuits into fine crumbs.Stir with melted butter and salt until the mixture resembles wet sand. Press firmly and evenly into the pan, pushing some crumbs up the sides about 1–2 cm. Use a flat-bottomed glass for a compact base.
- Chill the base: Refrigerate for 20 minutes while you make the filling.A cold, firm base prevents crumbs from lifting into the filling.
- Whip the cream: In a cold bowl, whip the heavy cream to soft peaks. Do not overwhip. Set aside in the fridge.
- Beat the cream cheese: In a separate bowl, beat the cream cheese until smooth and lump-free, 1–2 minutes.Add powdered sugar, vanilla, lemon juice, and salt. Mix until creamy and incorporated.
- Add Biscoff to filling: Beat in the Biscoff spread until the mixture is uniform and light. Taste and adjust lemon if you want a touch more brightness.
- Fold in the cream: Gently fold the whipped cream into the Biscoff mixture in 2–3 additions.Keep the mixture airy; don’t deflate it.
- Fill the crust: Spoon the filling over the chilled base. Smooth the top with an offset spatula. Tap the pan lightly to release air bubbles.
- Chill to set: Cover and refrigerate for at least 6 hours, preferably overnight.For the cleanest slices, aim for 8–12 hours.
- Warm the topping: Gently heat the Biscoff spread until pourable (microwave in 10–15 second bursts). Let it cool slightly so it’s warm and fluid but not hot.
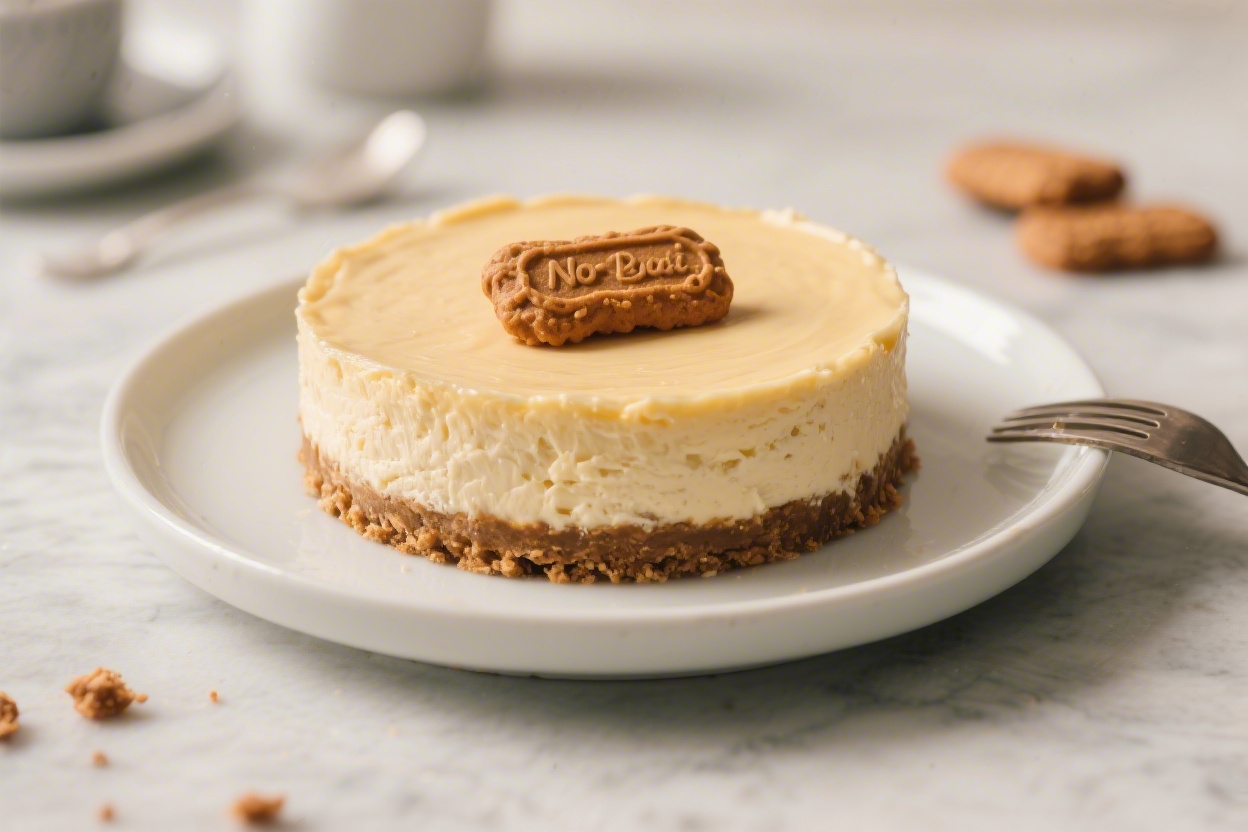
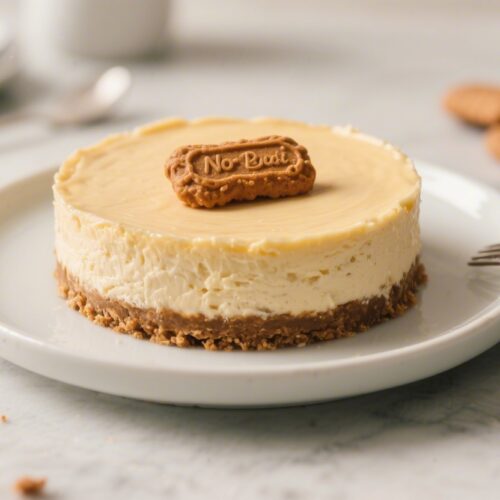
- Glaze the cheesecake: Run a thin knife around the pan edge and release the springform. Pour the warm Biscoff over the chilled cheesecake, tilting to coat evenly.Return to the fridge for 20–30 minutes to set the glaze.
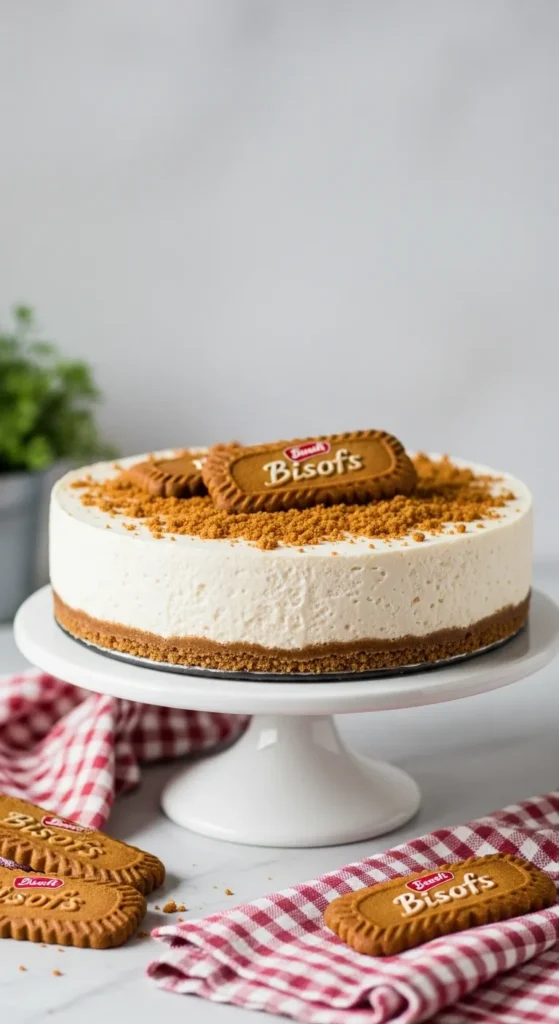
- Garnish and serve: Decorate with crushed or whole biscuits, and add optional whipped cream swirls or a dark chocolate drizzle. Slice with a hot, dry knife for clean edges.
How to Store
- Refrigerator: Cover and store for up to 4 days. Keep toppings like whipped cream off until serving for best texture.
- Freezer: Freeze the undecorated cheesecake (whole or sliced) for up to 1 month.Wrap tightly in plastic and foil. Thaw overnight in the fridge before topping and serving.
- Make-ahead tips: You can make the crust and filling a day in advance, then add the topping a few hours before serving for the neatest finish.
Benefits of This Recipe
- Beginner-friendly: No baking skills required, yet the result looks bakery-level.
- Customizable: Adjust sweetness, add spices, or switch toppings easily.
- Great for gatherings: Serves 10–12 and can be made entirely ahead.
- Reliable texture: Light but rich, thanks to balanced ratios and proper chill time.
Pitfalls to Watch Out For
- Overwhipping cream: If it turns grainy or stiff, the filling can become dense. Aim for soft peaks.
- Rushing the chill: If it hasn’t set, the cheesecake will slump when sliced.Give it the full chill time.
- Hot topping: Pouring very hot Biscoff onto the filling can melt or dent it. Let the spread cool slightly before glazing.
- Warm cream cheese: Too cold and it clumps; too warm and it can loosen the set. Room temperature cream cheese mixes best.
- Loose crust: Pack the crumbs firmly and chill.If the base is crumbly, the slices won’t hold as well.
Recipe Variations
- Chocolate swirl: Drizzle melted dark chocolate into the filling and lightly swirl with a skewer before chilling.
- Salted caramel twist: Add 1–2 tablespoons caramel sauce to the filling and finish with a light sprinkle of flaky sea salt on top.
- Espresso Biscoff: Dissolve 1–2 teaspoons instant espresso in 1 tablespoon hot water; cool and beat into the filling for a latte vibe.
- Mini cheesecakes: Press crust into lined muffin tins and fill. Chill 4–6 hours; top individually for parties.
- Lighter version: Swap a portion of cream cheese (up to 150 g) for Greek yogurt. Increase powdered sugar slightly to maintain structure.
- Nutty crunch: Fold in a handful of toasted chopped hazelnuts or pecans to the crust for extra texture.
FAQ’s
Can I use a different cookie for the crust?
Yes.
Graham crackers, digestive biscuits, or ginger snaps all work. Adjust butter slightly if crumbs seem dry or too greasy; you’re aiming for a damp-sand texture that packs well.
How do I get perfectly clean slices?
Use a long, sharp knife dipped in hot water and wiped dry between cuts. Chill the cheesecake well, and let the topping set before slicing.
Can I reduce the sugar?
You can cut the powdered sugar to 80–100 g.
The cheesecake will be less sweet but still stable thanks to the Biscoff spread and whipped cream.
What if I don’t have a springform pan?
Use a deep pie dish or an 8-inch square pan lined with parchment overhang. Lift out carefully after chilling, or slice directly in the dish.
How long should I let it sit before serving?
Serve straight from the fridge for the cleanest slices. If you prefer a softer texture, rest at room temperature for 10–15 minutes before cutting.
Can I make it gluten-free?
Yes, use certified gluten-free speculoos-style cookies for the crust and check that all other ingredients are gluten-free.
Texture and flavor remain similar.
Why is my filling runny?
Common causes are under-whipped cream, warm cream cheese, or not enough chill time. Make sure the cream hits soft peaks, cream cheese is smooth (not warm), and chill at least 6–8 hours.
Is there a way to add more tang?
Add an extra teaspoon of lemon juice or a tablespoon of sour cream to the filling. Taste as you go so it stays balanced with the Biscoff.
Related Recipes
- Keto Peanut Butter Cookies – Easy, Chewy, and Low-Carb
- Maple Brown Sugar Overnight Oats – Cozy, Easy, and Make-Ahead
- Mini Pumpkin Cheesecake Recipe – Creamy, Spiced, and Perfectly Portable
Final Thoughts
This No Bake Biscoff Cheesecake delivers big flavor with minimal effort.
It’s creamy, structured, and full of that unmistakable spiced cookie taste. Make it ahead, top it simply, and let the fridge do the work. Whether it’s for a birthday, a weekend treat, or a bring-along dessert, this recipe is the kind you’ll come back to again and again.
No Bake Biscoff Cheesecake - Creamy, Crunchy, and Effortless
Ingredients
- For the crust: 300 g Lotus Biscoff biscuits (about 10.5 oz), crushed into fine crumbs
- 120 g unsalted butter (about 1/2 cup), melted
- 1/4 tsp fine salt (optional, enhances flavor)
- For the filling: 600 g full-fat cream cheese, room temperature
- 300 ml heavy cream or double cream, cold
- 200 g smooth Biscoff spread (about 3/4 cup), room temperature
- 120 g powdered sugar (1 cup), sifted
- 1 tsp pure vanilla extract
- 1–2 tsp fresh lemon juice
- 1/8 tsp fine salt
- For the topping: 150 g smooth Biscoff spread (about 1/2 cup), gently warmed
- 4–6 Biscoff biscuits, crushed or left whole for garnish
- Optional: a drizzle of melted dark chocolate or whipped cream swirls
- Equipment: 8- or 9-inch (20–23 cm) springform pan
- Electric mixer (hand or stand)
- Mixing bowls, spatula, and offset spatula
- Food processor or rolling pin for crumbs
Instructions
- Prepare the pan: Line the base of your springform pan with parchment. Lightly grease the sides to help with clean release.
- Make the crust: Crush the Biscoff biscuits into fine crumbs. Stir with melted butter and salt until the mixture resembles wet sand. Press firmly and evenly into the pan, pushing some crumbs up the sides about 1–2 cm. Use a flat-bottomed glass for a compact base.
- Chill the base: Refrigerate for 20 minutes while you make the filling. A cold, firm base prevents crumbs from lifting into the filling.
- Whip the cream: In a cold bowl, whip the heavy cream to soft peaks. Do not overwhip. Set aside in the fridge.
- Beat the cream cheese: In a separate bowl, beat the cream cheese until smooth and lump-free, 1–2 minutes. Add powdered sugar, vanilla, lemon juice, and salt. Mix until creamy and incorporated.
- Add Biscoff to filling: Beat in the Biscoff spread until the mixture is uniform and light. Taste and adjust lemon if you want a touch more brightness.
- Fold in the cream: Gently fold the whipped cream into the Biscoff mixture in 2–3 additions. Keep the mixture airy; don’t deflate it.
- Fill the crust: Spoon the filling over the chilled base. Smooth the top with an offset spatula. Tap the pan lightly to release air bubbles.
- Chill to set: Cover and refrigerate for at least 6 hours, preferably overnight. For the cleanest slices, aim for 8–12 hours.
- Warm the topping: Gently heat the Biscoff spread until pourable (microwave in 10–15 second bursts). Let it cool slightly so it’s warm and fluid but not hot.
- Glaze the cheesecake: Run a thin knife around the pan edge and release the springform. Pour the warm Biscoff over the chilled cheesecake, tilting to coat evenly. Return to the fridge for 20–30 minutes to set the glaze.
- Garnish and serve: Decorate with crushed or whole biscuits, and add optional whipped cream swirls or a dark chocolate drizzle. Slice with a hot, dry knife for clean edges.
Printable Recipe Card
Want just the essential recipe details without scrolling through the article? Get our printable recipe card with just the ingredients and instructions.